| Honeywell DDP-516/H316 Minicomputer Simulation |
| Home
|
|
The H-316 Simulator
The H316 simulator is one of the minicomputer simulators provided by the The Computer Simulation Project (SIMH). The simulator is a complete implementation of the DDP-516/H316, supporting all options and standard peripherals, so it provides an excellent basis for the investigation of this system. In addition to that, SIMH is a simulation environment which makes many commands available for setting the configuration of the simulator, to set or examine registers, memory, peripherals, to start, stop, or single step the simulator, bootstrap programs, etc. etc.
The program however works from the command line and every operation, which on the real computer was made via the push buttons on the computer console, has to be done now by commands. Sometimes this is worthwhile, especially because SIMH has the possibility to group commands together in a script. It makes however the operation of the computer completely different from what it was.
In order to get a better feeling about the way the computer was operated in the past, I made a graphical front end (SimX16) for the SIMH-H316 program, which simulates the computer console of the DDP-516 and standard peripherals like the teletype ASR-33 and line printer. Also the low and high speed paper tape reader and puncher can be operated via the GUI. Magtape and disc might be added in a later version.
SimX16 was developed with Suse 9.2 (2006) and is not running anymore on the latest Linux releases (e.g. not on OpenSuse 12.1 onwards). This is mainly because the InterProgramCommunication mechanism is changed from DCOPserver into DBUS. So for the newer Linux releases a new version of the GUI frontend is made, called now: DDP516.
|
DDP516
DDP516 (as SimX16, see below) runs in combination with a modified SIMH-H316 emulator under Linux and is developed with Gambas 3.9.2. It can be downloaded from: DDP516_1, or DDP516_2. DDP516_01 is the 32bit version; DDP516_02 is the 64bit version. The readme.txt file has details about the installation. Operation of DDP516 is similar as SimX16 (see below).
|
SimX16
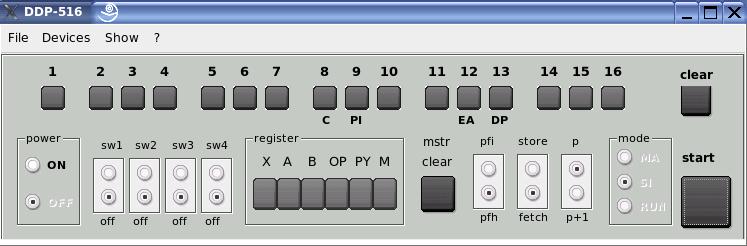
The simulator is organized around the operator console, which is similar to the console of a DDP-516, also with respect to the operation of the controls (switches, push buttons, indicators, etc.). For a complete explanation of the console, please look into the Honeywell document: DDP-516 Users Guide, Doc. No. 130071627, March 1967, which can be downloaded from: Bitsavers Software and PDF Document Archive. A short excerpt of this document can be found on the following pages: Console (for explanation of the controls of the console) and Console Operation (register setting, memory examination, etc.)
SimX16 runs in combination with SIMH-H316 under Linux and is developed under Linux with Gambas version 1.0.17. When running, SimX16 is linked by means of a pipe to the sysin of H316 through which commands to H316 are forwarded. Sysout output of H316 is piped back to SimX16. The used H316 program is a slightly modified version of SIMH version 3.7-0. In addition to a few patches for proper sysin/sysout communication with SimX16, this H316 version also contains a patch for the magtape and one for line printer operation. The H316 version to be used in combination with SimX16 is packed in the downloadable installation archive for SimX16.
SimX16 is free to use and can be downloaded by clicking on the following link: SimX16 Installation archive (current version: 0.91 April 2007, based on SIMH 3.7-0). The previous version 0.89 based on SIMH 3.6-1 is also still to be downloaded. Both versions have the same patches in the H316 simulator as part of the SIMH distribution:
a) patches for the cooperation of the H316 simulator and the Gambas based GUI
b) patches for the magtape, line printer and real time clock driver. (these patches have no relation with the operation of the Gambas front end but just make these simulated devices working properly)
The modified H316 simulator, part of the SimX16 Installation archive, can also still be used as a command line program, just as the H316 simulator being part of the SIMH distribution.
|
Installation
After downloading, the program must be unpacked and installed under Linux. The simx16-directory and its content can be stored in any directory (for instance in /usr/local/share). It is not necessary to have Gambas installed on your system; the required libraries are part of the simx16-directory. Only a symbolic link must be inserted in /usr/bin, pointing to the Gambas runtime module as explained in the readme of the installation file in directory SimX16.
A prerequisite to be able to run SimX16 is Qt version 3.2 or higher; so Qt must be installed in your Linux system.
After installation, the Honeywell Series 16 Basic interpreter (which is available in the installation file) can be used to see whether SimX16 is working. More detailed information about how to start this test is in the readme file. After successfully installation other Honeywell software can be tried after downloading it from the applicable software archives on the Web.
|
Screen shots
On the remaining part of this page you will find a few screen shots of the operational simulator and some remarks about its operation. By clicking on a picture you will get an enlarged version of it.
|
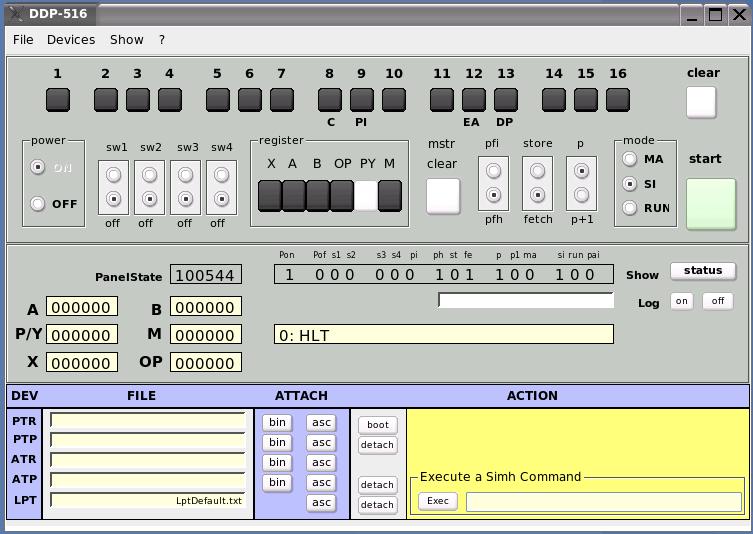
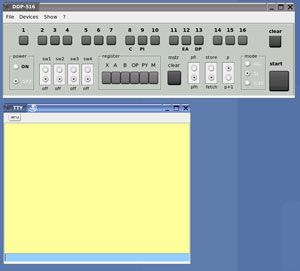 SimX16 started; DDP-516 Power Off SimX16 started; DDP-516 Power Off
|
|
After starting SimX16, the control panel and a window simulating the teletype printer become visible. The H316 emulator is started automatically in the background. Power of the DDP-516 is switched off, so the computer is on hold. Switches and indicators on the control panel are still inactive. The only switch which will react on a click is the Power-On button.
The panel also has a few menu entries of which the Devices menu is the most important one. Files can be allocated/created for the simulated peripherals with that menu. |
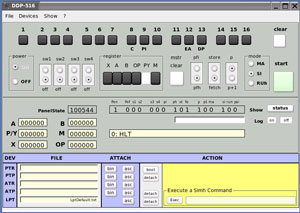 DDP-516 Power On DDP-516 Power On
|
|
After Power On, two additional panels become visible:
- Panel-2 showing CPU and Control panel state. Registers displayed in octal and content of memory location pointed to by P/Y register disassembled. Main purpose of this panel is "debugging".
- Panel-3 showing the simulated peripherals, whether a file is allocated to the device and whether that file is attached to the device, either in Binary mode or in Ascii mode. This panel also has a BOOT button for the high speed paper tape reader, to boot from a self loading paper tape image attached in Binary mode to that reader.
All switches and indicators of the control panel become active after Power On. The Start button is light green; the DDP-516 on the picture is in SI (Single Instruction) mode. Registers can be selected and be read or changed and a program (if in memory) can be executed step by step by pressing the Start button.
Memory can be read/changed if the mode switch is set to MA (Memory Access). If set to Run, and the Program Counter is filled with the program's start address, a program can be started. It is stopped again when the mode switch is set back to SI (assuming no other stop condition, like the execution of a Halt (HLT) instruction).
|
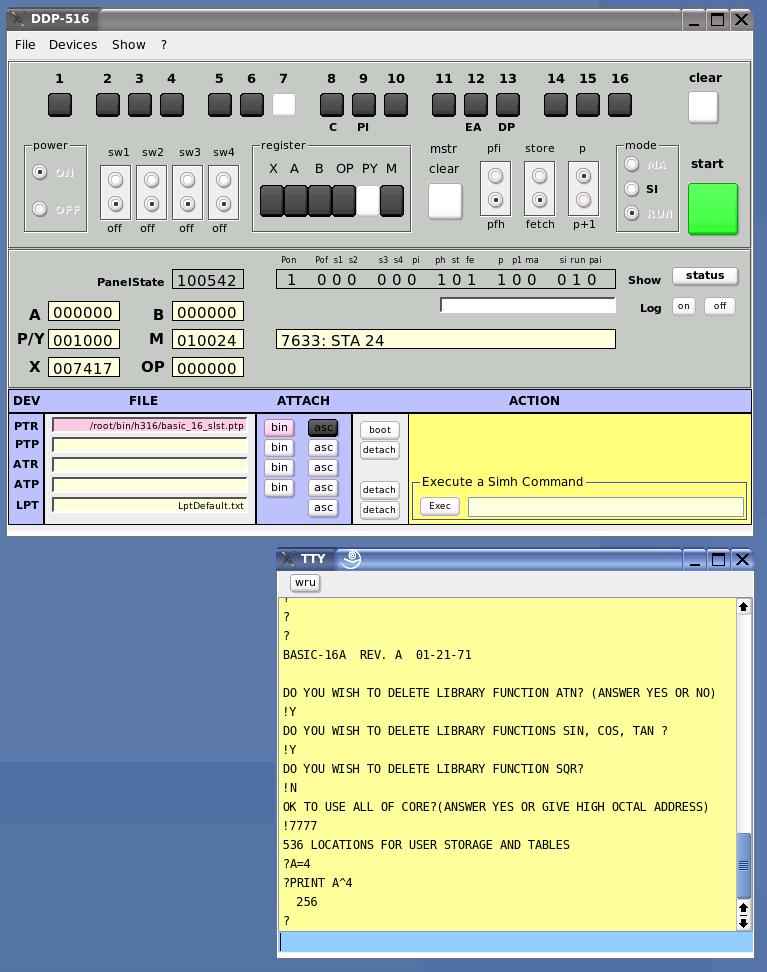
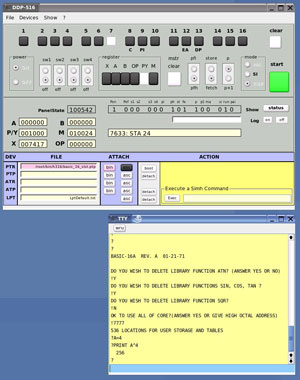 DDP-516 running the Basic DDP-516 running the Basic
|
|
The simulator is executing the Basic Interpreter. Basic is available as file image of the original Honeywell self loading paper tape. Self loading paper tapes are core images, which can be loaded with the bootstrap loader. In order to do that with the simulator, the file with the image of the paper tape must be attached to the simulated high speed paper tape reader. The file is selected via the Device menu and, when selected, becomes visible in the PTR (PaperTapeReader) entry on panel-3. By clicking the BIN-button, the selected file is Binary attached to the paper tape reader (entry and button become pink). By clicking Master Clear and Boot, the machine is boot loaded with the program read from the paper tape reader.
After load, the machine stops. By entering the program's start address (octal 1000) in the program counter, setting the mode switch to Run and clicking on Start, the Basic Interpreter is started and the initialization messages become visible on the TTY, waiting to be answered. When the machine is running, the Start button is green and the control panel is locked, except for sense switch changes and for setting the mode switch to SI in order to stop the machine.
The PC-keyboard acts as the keyboard of the simulated TTY. From the moment the Basic Interpreter is started, the machine is controlled by the TTY and after the initialization, a Basic program can be entered, edited, executed, etc.
wru = stop
break key = stop |
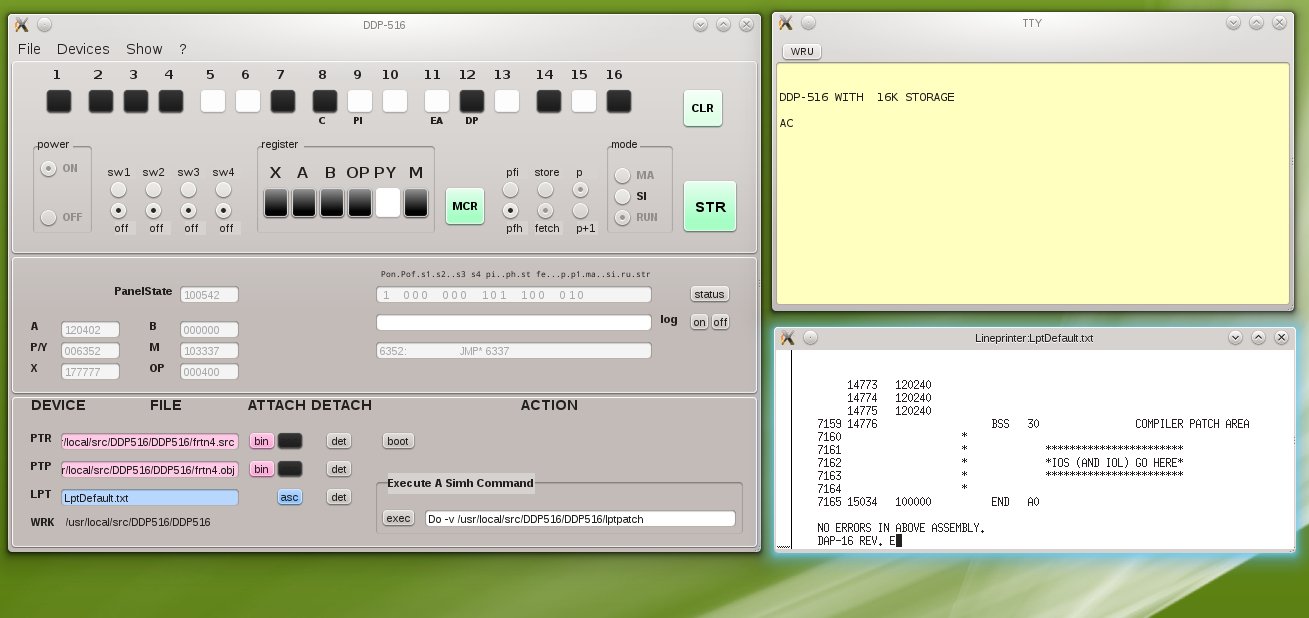
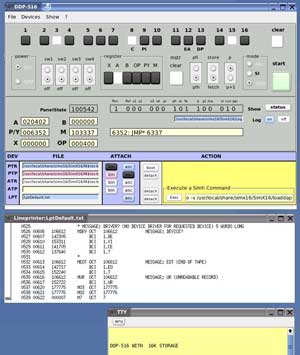 DDP-516 after finishing an assembly DDP-516 after finishing an assembly
|
|
This picture shows a just finished assembly executed with the DAP-16 assembler. At the start of the assembly, the source input, object output and listing output devices are selected by means of a A-register setting (see User Guide). To satisfy this selection, the proper simulated devices must be attached to files with the source input, for the object output and for the listing.
In this example the high speed paper tape reader (PTR) is attached to the file with the image of the paper tape source and the high speed paper tape puncher (PTP) is attached to the file on which the image of the object paper tape is produced. The PTR is attached in asc-mode (=Ascii mode; blue). The PTP is attached in bin-mode (=Binary mode; pink).
The listing is written to the simulated line printer. When a file is attached to the simulated line printer (in asc-mode = Ascii; blue) to catch the by the simulator produced line printer output, a window pops up in which the file with the line printer output is visualized (tail of the file is shown with the tail utility).
After an assembly, the files attached to the devices stay attached so can be use with the same files for a next assembly. De attachment is also possible so that a next assembly can be started with a new set of attached files. |
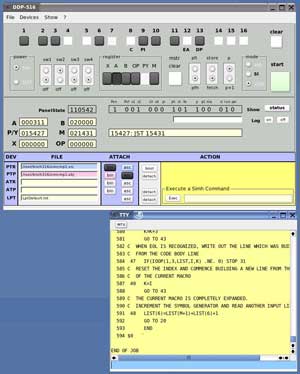 DDP-516 after completion of a Fortran compilation DDP-516 after completion of a Fortran compilation
|
|
Here we have something similar as in the previous example, but now it is a Fortran IV compilation. The source is again attached to the high speed paper tape reader and the object goes to the file attached to the high speed paper tape puncher. The listing this time is printer on the teletype, which is always attached.
Also with the Fortran compiler are the devices to be used for source input, object output and listing output selected by means of an A-register setting at the start of the compilation and the selected devices have to be attached to the proper disk files before the compilation starts.
With the sense switch setting is the type of the produced listing selected (e.g. an extended listing or a short listing as in the example).
When the compilation is finished, to produced object file can be detached, the linking loader be loaded and with that loader the produced object tape can be linked with the Fortran Library. After the linking is complete, the compiled program can be started. |
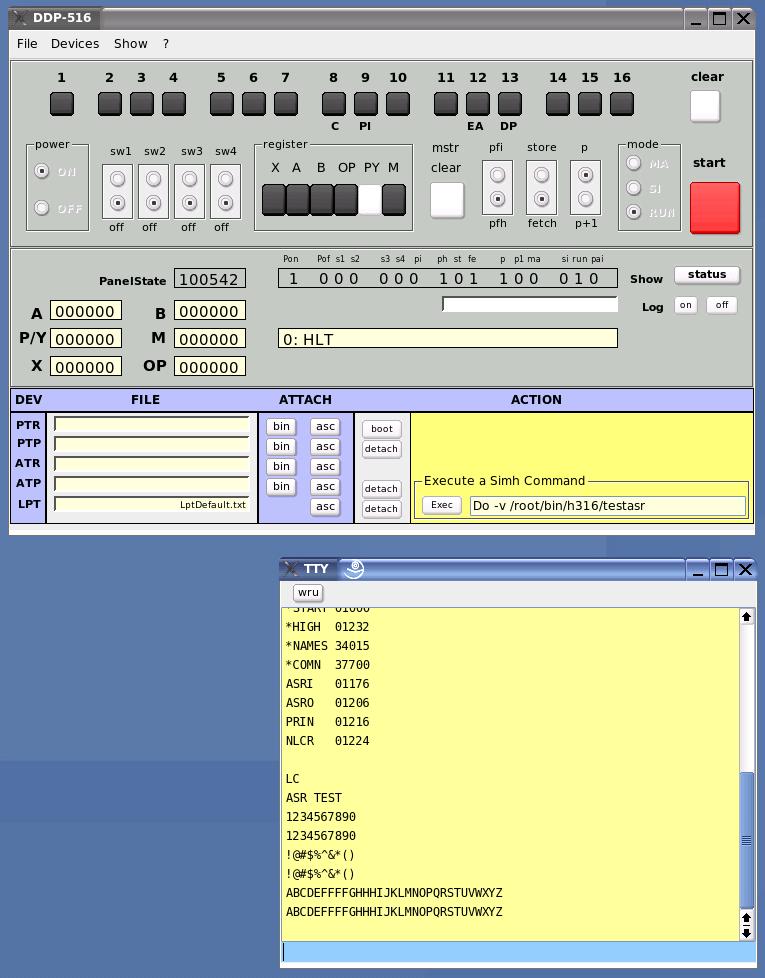
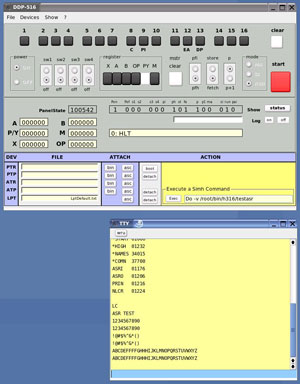 DDP-516 executing a do-script DDP-516 executing a do-script
|
|
As mentioned above, the SIMH simulator has the nice possibility of grouping together simulator command in a script. Registers can be set, files attached, the simulator be started, files detached, programs boot loaded, etc. ect. by means of such a script. The operation of the simulator is not interactive anymore and a GUI is completely superfluous for this type of operation.
But also when operation the simulator with a GUI it is sometimes worthwhile to execute such a script for example to set the simulator in a particular state and to operated interactively from that moment onwards.
SimX16 has the possibility by means of the Exec button and the text field in the yellow part of panel-3 to execute a SIMH simulator command. This can be each SIMH command, so also the "do" command which starts the execution of a script.
During the execution of a command from the text field (so also with a do-command), the Start button becomes red and panel-1 is completely locked. The only way to stop simulation (e.g. when a program is in an endless loop) is by means of clicking the WRU-button of the TTY window, or by pressing the break-key on the keyboard.
Please be aware that the GUI is not aware of the type of command executed this way. The offered commands go strait into the simulator and do not have effect on the state of the front end. So if for instance a file is with the GUI attached to the PTR and de attached with a direct SIMH command, then the file is still attached for the GUI (but indeed, not for the simulator).
|